Persnickety Mitten

Persnickety

Persnickety Mitten with yarn balls. Pattern by SpillyJane Knits. Knit by: Anne Grove.

Yet a mitten from SpillyJane Knits. This is one is really cute. Cute and simple. I am not sure what drew me to it: the pattern or the name. I have no idea what is means – is it a place perhaps? It’s just so darn fun to say (not that I know if I pronounce it correctly).

The palm is not my friend. At least not before blocking it. I don’t know quite yet. Perhaps I’ve just been occupied and tired this week. Lots is going on and thoughts are wondering off every time I sit down to knit.

Anywho, this is going to be a short post as I am currently out feeding 30 geeks. I probably won’t find the time sunday to post the finished mittens as I won’t be home before very late. But don’t despair – I have a small post ready for the sunday read 😉

Back of Persnickety Mitten.

Back of Persnickety Mitten.

I have done two pairs of mittens from SpillyJane before on this project. Or one as a warm up and one as the first pair of mittens. The gnome mittens and the flamingo mittens.

SpillyJane patterns contains instructions as well as a chart. It costs $ 6.00 USD but if you purchase several at a time she gives a nice discount. You can find the pattern here on Ravelry or on her etsy shop.

Rosa Ros

Rosa Ros is a modern version of a traditional scandinavian motif. The rose is seen throughout Scandinavia but are of course mostly know as the selbu rose (from Norway). Gotland (Sweden), how ever, has a lot of roses – less figurative than the Selbu.

Solveig Larsson, the knitter behind has dedicated her life to mittens. She published the book The Mitten Book and I tell you, it’s an inch+ thick book of mitten after mitten. Almost every other page is a new one.
All Solveigs patterns are

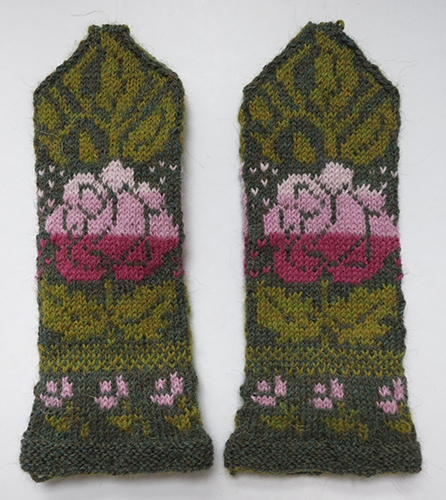
Rosa Ros. Pattern: Solveig Svensson. Knitted by Anne Grove.

Rosa Ros. Pattern: Solveig Svensson. Knitted by Anne Grove.

This project, let me tell, it was a joy! The stitches just flew from one needle to the other and before I knew of it I had finished the first mitten. I had actually intended to knit these on the span of two weeks as per the setup of this project. But as a good book I just couldn’t put it down. It has been a joy doing these mittens. I think they might be my favorite so far. I’m sure they would be yours too if you could feel them. ‘Cos yum!

Solveig is very clear on her choice of yarn: alpaca. And this does give a wonderful mitten. If you are not used to knitting with different qualities of yarn you should do yourself that favor. A wonderful project can be amazing with a good quality yarn. I am glad I did these mittens in the recommended yarn^^

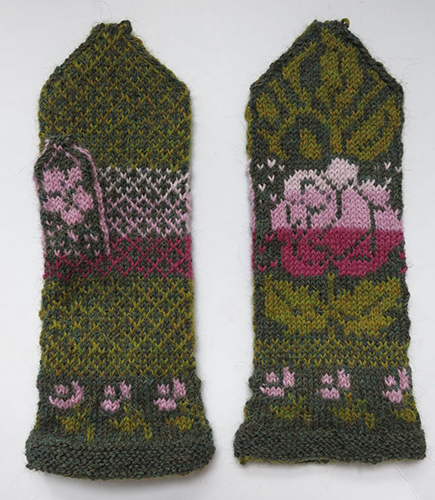
Front and back picture.

Front and back picture.

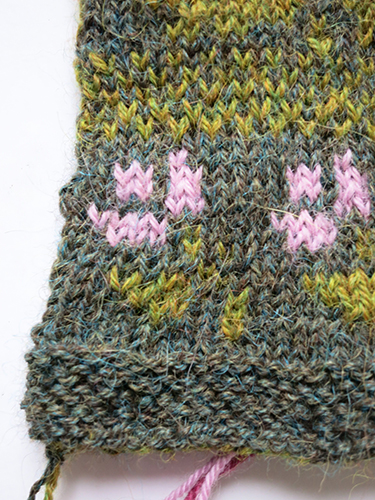
The cuff

The pattern doesn’t have a start to the cuff, non of her charts do. Normally most mittens will have some kind of edge before the charted cuff part. In The Mitten Book, Solveig have a chapter in the beginning showing different kinds that one can pick and choose from. I don’t remember if she writes this, but I have seen her use it on several mittens. I did a 12 rounds garter stitch. Plain and simple. I like that it doesn’t take from the pattern, but I do figure that others will like some cute edging – luckily you can choose which you use for your project 😉

Close-up of cuff, Rosa Ros.

Close-up of cuff, Rosa Ros.

Notes and thoughts

1. Choose an edging for the cuff. I chose a simple and somewhat stocky cuff: 12 rows of garter stitch.

2. I also added a very little detail to the pattern. I don’t know if it shows in any of the pictures but casting on I used both green colors. Giving a small row of light green loops before the cuff. I didn’t do it in any fancy way, I just made a loose knot to tie the two strands together and unwound it afterwards.

3. Yarn choice. Do yourself a favor and knit this pattern in alpaca! It deserves it and it’s what Solveig would do. It makes it a little fluffier, softer, smoother and much more yummy^^ I used DROPS alpaca for these, but you can use any alpaca

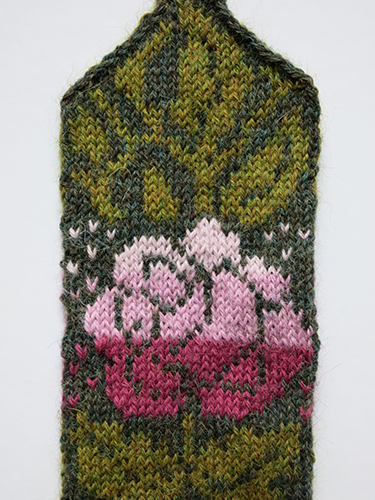
4. Color choice. The three shades of light pink for the rose can be tricky. I love the three colors I chose, while on their own. But the leap from first to second was just too big. Several times while knitting I discussed with myself if I should unwind and do it only in two. Just have in mind when you pick out colors that one color isn’t too powerfull and take out the pallet.

Besides being an awesome knitter and author she is also a wonderful person! She helped me to the pattern without much ado about nothing. And thank you for that, Solveig!
If you want to see more of her amazing mittens she has about 160 on Ravelry, you can see them here. You can also go to her webpage, though I could only find it in Swedish. Her website can be found here: solveigs vantar.

If you want to get your hands on this pattern you can get it, and many more patterns by purchasing The Mitten Calendar 2013 through the webpage. I will also recommend buying her book. It’s simply amazing. It comes in scandinavian languages and english (at least! that’s just what I know of).

Closeup of rose pattern - just because I'm in love with it!

Closeup of rose pattern – just because I’m in love with it!

Dr. Zoidberg in the house

And in the living room too! These mittens are as fun and easy as they are fast to knit. You only need to be able to knit, purl and make a stitch.

I haven’t met anyone so far that hasn’t gotten shiny eyes from seeing these. Oh how I wish these were adult size. It’s gonna have to be a project to come^^

Lobster Claw mittens. Pattern by Morehouse Farm. Knitted by Anne Grove

Lobster Claw mittens. Pattern by Morehouse Farm. Knitted by Anne Grove

I made the medium size. I must admit I don’t have a clue about for what age child this is. The only directions for size is small, medium, large and then with how to size for your own child. As I don’t have a child at hand to test on I have no idea what the measurements tell. On the finished size I would guess a size 4-5 years, but I am not all sure. If any of you have any input on what age fits a hand that measures 4.5″ do tell!

In general I actually don’t have much to say about this pattern. Normally I would do a ‘notes & thoughts’ but I don’t really see the relevance this time, so I will leave it out. The only “problem” I had was about the size.
The pattern call for a double stranded cast off – I did a single as I like how it roles. That’s the only change I made.

I normally rave about the layout, as it’s in my opinion very important for the comprehension and the overall impression. The pattern is easy to understand and doesn’t fill more than one page (and no more is needed!) so it’s very easy to keep an overview.

Lobster Claws

The Lobster Claw mittens can be found here on Ravelry or directly on  Morehouse Designs. It’s priced at $5.00 USD. You aught to check out their other patterns. Many fun and quirky! They have some scarfs that will make you giggle all day long.

Owls in trees on wooden needles

In Africa and the Middel East the owl is a potent of death. If you see or hear it’s hoot, it means someone will die. In general they are omens of bad luck, ill health and death. It is still a belief today. In the Americas the owl is surrounded by taboos, that often has do to with sorcery and evils. They too considered the owl as a symbol of death and destruction. The Aztec god of death was even depicted as an owl.

In western cloture it’s associated with wisdom. But it has too been associated with bad omen as a ‘monster of the night’. Today however the owl has come into fashion and is considered a cute animal. There is something about those big eyes and surprised look! It’s simply a hoot!

Owl in Tree Mitten. Pattern by Fact Woman from Mod Knits. Knit by Anne Grove.

Owl in Tree Mitten. Pattern by Fact Woman from Mod Knits. Knit by Anne Grove.

So the first Owl in Three mitten is done (not blocked yet) and the second is coming along nicely. Owls do belong in trees but it’s not that often you see them depicted there, not these days at least. For this project I decided to try to work not so tight as I normally do. It went fairly well but resulted in a bit wonky mitten. I am sure it will be just as it should be after I’ve blocked it though. It went better than expected and the big test is to do the second in the same gauge.

This pattern by Fact Woman of Mod Knits contained not just the wonderful pattern but also a guide to latvian braids. For me this was an important part of the pattern as I want to portray this technique. It is a traditional way of decorating, especially cuffs, on mittens in Eastern Europa as well Scandinavian. In the scandinavian mittens I have seen it mostly on young girls mittens: simple white mittens with a colored braid to underline the cuff.

Owl in Tree mitten: palm of hand.

Owl in Tree mitten: palm of hand.

I found this amazing teal colored yarn and I had to do this mitten in it. It might not be so tree like but it’s beautiful! These pictures doesn’t do the teal color justice but it’s as close as I can come with the camera I have at hand at the moment.

Latvian braid

This was my first try at Latvian braids ever and I can tell you they are surprisingly easy to do! 😀 Which is very awesome. It does of course take longer than just knitting as you need to twist the yarn and knit a stitch, twist the yarn and knit a stitch. But it’s definitely worth it! The first braid lies a little better than the second, but I think this could be because I didn’t work the second braid so much into shape as the first one. This just means I have to do a little more work on it – maybe steam it a bit. If you want to steam smaller knitwear you can do it over a pot of steaming water shape it a bit and then shake it lightly.

Detail of cuff and latvian braid.

Detail of cuff and latvian braid.

Besides the braids you can on the picture see the detail of the beginning of the cuff. It has an edged look to it and is folded in two. I sewed the fold in after the mitten was done but it looks like Fact Women did it differently. Or at least very early in the process as several pictures show it being done already when doing the latvian braids. There is no mention about how and when.

Notes & thoughts

1. The pattern is nicely made and easy to understand however it’s a bit strangely put together. The first page is very packed with pictures, size+gauge, what you need, keys and a chart. It would have helped a lot if the first page was only a front page with pictures and then the second page was the pre work information. Also I find the placement of the instructions for the Latvian Braid quite strange. It is placed in the middle of the pattern and not in the end, even though it has a distinctly different look form the rest of the pattern. It was obviously done as two different parts and then just plotted in and it shows. This doesn’t mean it’s a bad pattern or the direction aren’t helpful, but it feeds to the overall impression and experience of the project.

2. The latvian braid tutorial is very well made. In my opinion the pictures with the captions is all that is needed but my way is very visual so it’s good there is description in text as well. Again I would have liked a bit different layout, but it’s not a big problem as to understanding.

3. The charts of this pattern are well made and easy to read. They are in two colors that isn’t too big a contrast to each other so it’s nicer for the eye to look at. I appreciated this.

4. I was quite confused about the use of increase in form of ML and MR. Every time I have done that increase in patterns before I have done it the opposite way of what this pattern writes. I don’t know if this is a mistake, intensional or maybe it’s just common to this where Fact Women works. If confused me at least!

5. In particular I enjoyed the palm pattern. I have a fondness of this kind of pattern and it’s the first mitten I’m doing in this project that has such a small pattern. The Jolnir Mitten had something a little like it, but that was a little larger. It’s a traditional way to do palm. It’s makes for a thicker textile which gives more warmth, durability and protects the palm.

Owl in Tree Mitten: palm detail.

Owl in Tree Mitten: palm detail.

A freudian slip stitch?

Em from Karlskrona, Sweeden made these (and other awesome geeky mittens) mittens. This is just full of puns! When you do a slip stitch on these mittens, is it a freudian slip? If you do them in pink are they Pink Freud? I am having waaay too much fun!

374532_10151297604788059_1120408046_n

Go here and see her other wonderful knitted projects. You can find Mushroom and Batman Mittens. Oh and adorable elephant mittens! Yay!

Either Or off the needles?

Either Or is not just the title of Februarys second mitten but also that of a very well known  philosophical work. Either Or was written by Soren Kierkegaard a Danish philosopher of great importance. It consist of two volumes Either and Or (Enten-Eller in Danish).
This book had a special place in my childhood home as my father is an academic in the field of religious philosophy, he works in particular with German philosopher Schleiermacher and with Kierkegaard.

Either Or Mitten. Pattern by Lee Meredith of leethalknits. Knit by Anne Grove.

Either Or Mitten. Pattern by Lee Meredith of leethalknits. Knit by Anne Grove.

The pattern is written by Lee Meridith of leethalknits. She makes wonderfully whimsy patterns that make great projects for homespun and art yarns. She is good at explaining the techniques used which is really great for this pattern. It looks very difficult but it is  simpler than that!

The pdf contains patterns for three different Either Or mittens. The short fingerless, the long fingerless and the mitten. This pattern is shaped around your hand as you knit, which means you need to size it on your hand. I am doing the long fingerless. As it was the pair that I fell in love with and it’s most versatile. Also very important it fits several sizes easier and as I have tiny hands I need not to fit them too much to my self.

Either Or mitten. Pattern and picture by Lee Meredith, of Leethalknits.

Either Or mitten. Pattern and picture by Lee Meredith, of Leethalknits.

This week has been a bit different from the other weeks. Which will also show in this blogpost. This pattern isn’t just ‘plug and play’ it’s a 28 pages long pdf. Which is pretty daunting! It is very well made and it’s great to look at but it is a bit confusing the first time you read it. I want to make it clear I can’t see how this pattern should be any shorter than the 28 pages. Just make sure to read it a couple of times before starting your project and have in mind that sometimes patterns doesn’t make sense before you just knit it.

One tip I can give is to follow the directions and don’t question them (I’m really good at that!) then it all makes sense. It’s a bit like knitting heels on socks for the first time. Don’t think, just do it.

This mitten differs from regular mittens as it’s knit from the thumb and out, working around the hand. When your work is large enough to fold around your hand you gather and work back and forth and “seem” the mitten up.
This technique confused me at first as it’s not until you get quite far down in the pattern you can see directions for sizes. I at least need directions for sizes as I have tiny hands and knitting for this project I need mittens not to be my size all of them as most of you wouldn’t be able to fit them afterwards.

On the test mitten I tried a little of it all. I did the stripes, I did the garter stitch wrist and I did the stockinette stitch wrist. I ought to knit another one so there is a pair, don't I?

On the test mitten I tried a little of it all. I did the stripes, I did the garter stitch wrist and I did the stockinette stitch wrist. I ought to knit another one so there is a pair, don’t I?

What I did was to knit a test mitten. To learn the pattern. To see how the different wrist/hand parts would look. I chose to knit the mitten in a soft store bought alpaca that already had a gauge guide on the wrapper to take that part out of this first calculation. Also I did the mitten in two different colors to test out that part of the pattern.

I originally thought I would do that with the final mitten as well but I changed my mind after I looked in my yarn stash. I wanted to use handspun yarn for this project as it’s in the spirit of Leethalknits but also because this patterns really can showcase the yarn.

I found an amazing wool blend. What it is I don’t know for sure as it didn’t have a label on it. Also I had to go look deep in the craftster logs to find out who made it. I got it in a swap a while back and it truely is amazing. I love earthy colors combined with turquoise. The woman behind this yarn is nicknamed Bugaboo1 – her real name is Stephanie Woolever (preeeetty perfect for a spinner if you ask me!).

The mittens are different from each other because of the handspun yarn. You can see differences from mitten to mitten as well as on the two sides of the mitten.

The mittens are different from each other because of the handspun yarn. You can see differences from mitten to mitten as well as on the two sides of the mitten.

WPI-method

WPI is short for wraps per inch. As simple as it is, you wrap your yarn around a ruler or a knitting needle and count how many wraps there is per inch. Use this method to help you determine what size needle you need for your handspun yarn (or a skein that lost its band).

For this pattern I would recommend not using a yarn that has super bulky parts as well as fingering parts. But using a yarn that varies is not a problem as you can see on the picture with the three types of mittens. Have in mind if you knit with varied thickness yarn that this might effect the row count for the thumb of this pattern.
Try to find an average, if the wraps per inch count is an uneven number use the highest number. That way you allow the thick yarn not to end up being knit too tight. What happens when your textile is knit very tight is that it get stiffer and can seem a little coarser.

This part a compilation of what you need for this pattern. To find chart and read more on the WPI-method see my post here.

The unblocked Either Or Mitten twists and turns a bit. The different knit directions and the change in stockinette and garter stitch makes it twist.

The unblocked Either Or Mitten twists and turns a bit. The different knit directions and the change in stockinette and garter stitch makes it twist.

I would recommend Meredith to try to revise her pattern. Not because it’s missing anything as such. But I think that a different way of organizing it could help immensely on the difficulty level. It seems completely impossible to get an overview to begin with and it was only when I had done the third mitten I could maneuver around in the 28 pages long pdf with confidence.

It would probably make an even longer pdf, but it would make a big difference if she had chosen to gather the pattern for respectively short fingerless, long fingerless and full mitten each in their segment. It is extremely confusing in an already confusing pattern to have to scroll back and forth (/jump from page to page – if printet). I think that such a change would render the pattern much more comprehendible and thus easier to use.

I do however like the last 6 pages that is made to print only the pattern without the pictures. However I needed the pictures to understand what she wrote on the first and a little in the second mitten. So I was dependent on the full pdf throughout most of this project.

Notes & thoughts

1. Do a test mitten! The first mitten takes AGES to do as you try to find your way through a lot of numbers and abbreviations. In danish we have a saying that directly translated is “to keep your tong straight in your mouth” (At holde tungen lige i munden). You need to focus a lot to understand this – the first time.
Already when you knit the first mitten of the pair (the second, counting the tester) you will find that it’s much much easier. And the third – well that’s just like any other easy to regular difficulty leveled pattern.

2. Thumb: You count how many rows you knit for the thumb and you write it down, according to the guide. But have in mind if you are knitting in a homespun yarn that varies a lot that this count might not be the same.

Notes for Either Or Mitten

3. I would recommend doing notes when knitting this pattern. It helped me a lot. Just a little pad to note down on next to your pattern. If you print the pattern you have boxes to put on little counts but I like to have them on one page compared to a minimum of 4-6 pages of the pattern. Personally I prefer to have it all on one pad so I have all the notes on one page.

4. Use different colored or sized markers! All 7 of them – otherwise it can get really difficult to follow the pattern. I used:
mA blue, big  (beginning of round)
mB1 white
mB2 red
mC1 purple
mC2 light red, big
mD1 blue, small
mD2 light red, small
It was a huge help to me that I noted down what markers had which colors. Working with 7 markers I needed to be able to color code them to make sure I didn’t loose my way during the pattern.

5. If you are doing a mitten for someone else (= a different handsize than yourself) go to page 12 to read what to do. If you follow the pattern slavish don’t think about this, but if you like me like to know a little about sizing before you start, you will find the information on page 12, last section.

A little tip: When you are doing a project that is very complicated have a super easy project to work on as well. Sometimes you just need to knit. Sometimes you need to see progress and that can be hard to see in a project that is very intricate and needs a lot of focus on the technical side. This helps me keep up the spirit and joy of knitting while attempting new challenges.
Edit: For this project I did the Mittenz by Mariella Apodaca.

Despite all the hardship I would enjoy to make more of these mittens. It’s a joy to knit when you get the hang of it and it’s a perfect project to showcase amazing yarns! And who doesn’t need a good excuse to buy amazing yarn – now that you have a pattern to use it with? 😉

Either Or Mitten

An exclamation of mittens

IMG_0619 copyI visited the local art museum AROS with a friend the other day and outside we found an exclamation mark of mittens. Wether it’s an ‘i’ or and ‘!’ we couldn’t really figure out as there was no explanation just a very large amount of mittens on the ground.

I snapped a picture of some of the few knitted ones. Some are machine knit other are hand knit, no matter they are adorable all of them. There was one, a red one, that stood out in particular. Unfortunately I didn’t manage to get a good picture of it. Boohoo! The light was tricky as it was cloudy and the sun was almost gone. Oh well. I’m gonna include it anyways as you can get an idea of what it looked like. I have an idea that these mittens were lost around the city during the cold months of Denmark but I am not sure. It will be a question mark of mittens for now.

IMG_0611 copy IMG_0613 copy

IMG_0614 copy
IMG_0615 copy IMG_0617 copy IMG_0618 copy
IMG_0620 copy

Month of Hearts – Jolnir

Jolnir Mittens on the needles.

Jolnir Mittens on the needles.

Jolnir is another name for Odin, the all-father in the old norse mythology. Woolbox Designs is located in Sweeden and this influences the pattern greatly. Jolnir has several very traditional elements, not just the name, the thumb gusset, the pattern of the palm and the general build up of the pattern.

Emmy Petersson, the author, writes how this pattern reminds her of christmas and they are very scandinavian christmassy. Especially in the gray and the red color combo. But they do have the hearts. I’m actually glad you chose this pattern. It’s sweet, homy to me and I love the modern feel to the hearts. St. Valentines can seem too over the top sweet but these mittens keep it on a level that I as modern scandinavian creative person can deal with hehe.

Jolnir Mitten. Pattern by Emmy Petersson. Knit by Anne Grove.

Jolnir Mitten. Pattern by Emmy Petersson. Knit by Anne Grove.

The pattern has a ribbing cuff that is actually a functional cuff (in comparison to the gnome and flamingo mittens). Which is tradition on scandinavian mittens – we have the snow to keep out you know. I like how it’s not just 6 cm of one color ribbing but a combination of lines of the two color so it actually ties in with the chart.

I love the coherency of this pattern. It’s all in all a very well made pattern. It’s a joy to work with.

Better pictures will be taken by the Jolnir Mitten later! These of the full mitten are taken at night and are just impossible to get really nice. But at least you can have a view of them now 🙂 I want the post up before the next poll!

Jolnir Mittens

Deadline

For this mitten to be done in time I need to knit at least 14 rows per day to meet the deadline: 14 rows ribbing + 70 pattern chart / 6 days = 14 rounds/day

Notes & thoughts

1. The layout of the pattern is wonderful. The graphics are just adorable! And they are coherent and consistent all the way through. They are simple and they are used to make paragraphs and the overview of the pattern easier, which is a joy to work with.

2. This pattern contains only chart so if you are used to using written directions or just don’t like to use a chart this could be a challenge for you. But I do plea you who are of those conviction do make this pattern – it’s just too adorable not to!

3. The Jolnir Mitten has several places where long strands of yarn go along the backside, which is in color knitting a classic “problematic place”. It’s here it’s easy to tighten to much and make the heart pattern bulky. Just if you should do this mitten have in mind that yours isn’t ugly compared to mine (a very common thing to hear when others look at knit work they haven’t done them selves) let me tell you: I have to block these mittens to just make them look close to nice! 😉

Materials: Marathon in medium gray and deep red.

Materials: Marathon in medium gray and deep red.

Jolnir is made by Emmy Petersson and published in Woolbox Designs. You can find it here on Ravelry. The pattern comes in both Swedish and English versions. You can find Woolbox Design here. Emmy Petersson has 6 amazing color knit patterns, four of these are mittens! All in very traditional scandinavian in style yet they are quite modern they are a joy to look at.

A little luxury treat

I’m very sorry for the delay. I have had technical problems combined with the flue so I’ve had to postpone this post a little. But it’s here now 🙂 Hope you enjoy.

So this past week I should have used finishing the Meta Mittens but they were finished in a week 😮 I wrote in my post about the meta that I was going to use my week on a pair of mittens for a friend butbut it didn’t turn out that way. The project mittens for Grisling is gonna take a little longer. I’m doing the pattern from scratch and half way through the first mitten I decided to do it in a completely different way so they are not gonna be finished this week. BUT I had left over yarn from another knitting project that looked to be about what was needed for the fingerless Reciprocation Mitten from Knit Purl Hunter.

Reciprocation Mitten. Pattern by Knit Purl Hunter. Knit by Anne Grove

Reciprocation Mitten. Pattern by Knit Purl Hunter. Knit by Anne Grove.

The pattern is free and yay for that! It’s well written and easy to follow. Download the pattern here. Take a look at her Knit Purl Hunter pattern shop or visit Knit Purl Hunter on Ravelry. She also has a bunch of free patterns here.

Materials

I knitted two yarns together. Angel by Permin, col. 04, 70% Kid mohair, 30% Silk. Alpaca Silk by Hjerte Garn, col. 2250, 60% Alpaca, 30% Merino wool, 10% silk.
They were left over from another project. I would never use kid mohair. I am just not fond of the fuzziness I guess. But it is amazing and the result, with the silk and alpaca, is just like a fluffy little cotton candy cloud! It’s soft and warm too!

Reciprocation Mitten. Upper side and palm side view.

Reciprocation Mitten. Upper side and palm side view.

I changed quite a few things on this pattern or rather I removed quite a few things. I had a considerably smaller amount of materials than the pattern calls for, so to get two shorter mittens of the same length I first removed the ‘middle’ part from the cuff and up to the part where the thumb gusset is started. Also I had to shorten the hand (simply cast off earlier than chart said). Ind the end I made the thumb a little smaller too. It just had too much ‘fabric’ in it so it flopped and wouldn’t lye nicely (= sized wrong. If you sew you might have experienced this).

/confusing explanation/ This hole process involved a lot of unraveling! First I did the ‘middle’ part and then I unraveled it. Then I knitted the full hand chart of the left mitten knowing I would unravel part of this as well. After knitting the first 4 (of the 7) repeats of mock cable of the right mitten I wasn’t happy about how it looked so I unraveled it and started over again. When I knit the thumb gusset and the thumb of the right mitten I unraveled part of the left to be able to knit a little of the hand on the left and make the two the same length //confusing explanation ended

The mitten is too big for me. I can wear them but they are for a women’s M/L. They are truly heaven to wear. So soft, warm and light at the same time. It’s a little luxury treat.

Reciprocation

Notes & thoughts:

1. The pattern is very well written. It has all the way through references to videos you can find on youtube if you need to see the technique

2. Michelle Hunter writes how to distribute the stitches on the needles, which is wonderful she thought so far. You distribute the stitches to make it easier to follow the pattern. You fx. have one needle with top side of the mitten and the palm side on two needles. But I don’t find this very helpful. When you knit on three (a total of four dpns) it makes it harder to handle if you have half the stitches on one needle and the rest on two when working with something as small as a mitten. To have a more stabile and easier work ‘space’ I distributed the stitches like this: #1:18, #2:22, #3: 20. I didn’t split the 60 stitches up evenly because of the ribbing pattern of k4, p2.

3. The thumb is quite wide and I ended up redoing it. The 26 stitches that is made into 24 by to times k2tog on the first row could easily do with a increase or two more. I redid the thumb with only 21 stitches. If you want to do it the same as me you do this:

Place first 10 stitches from stitch holder onto a double point needle. This will be Needle #1. Place last 10 stitches from stitch holder onto a second double point needle. This will be Needle #2.
With a third double point needle, pick up one stitch in “ditch” on left side of thumb opening (area between Needle #2 and the backward loop cast on stitches), pick up 4 stitches above thumb opening (former backward loop cast on stitches), and one stitch in “ditch” on right side of thumb opening (area between the backward loop cast on stitches and Needle #1). There are 6 stitches on Needle #3 for a total of 26 thumb stitches.
Beginning round at Needle #1, join yarn leaving a 12” tail. Knit 20, k2tog (left ditch stitch with 1st cast on stitch), k2, k2tog (last cast on stitch with right ditch stitch). 24 thumb stitches. Next round: Knit 19, k2tog three times. 21 thumb stitches. You now have 9 stitches on Needle #1 and #2, and 3 stitches on #3.

The pattern is made by Knit Purl Hunter, Michelle Hunter. You can fid her here Ravelry. The pattern can be downloaded for free here. Knit Purl Hunters pattern shop is quite nice so go check it out here (she also has a bunch of free patterns from Knit Purl Hunter here)

Meta Mitten….finished!

So you chose the Meta Mitten and I’m pretty happy you did! Besides being adorable it is also a pretty fast project. Compared to the Gnome Mitten and the Flamingo Mitten this is knit on needles two sizes bigger; a size 3,5mm (us4). I finished the first mitten thursday and sunday I finished the second mitten. I still need to block the mittens buuut I can’t resist to post the finished mittens anyway.

Good I have an extra project I can fill up my week – also a mitten, done in a home made pattern by yours truly. I will post about that as well of course. Hah. As if I would not knit for a week! I always have too many projects on the needles and more waiting to get cast on. I need to have something distract me a lot not to knit just a little for an entire week.

Meta Mitten. Pattern: Cotten Gin and Tonic. Knit by: Anne Grove

Meta Mitten (unblocked) Pattern: Cotten Gin and Tonic. Knit by: Anne Grove

The timeframe for this pattern differ a bit from the first mitten as it’s knit on bigger needles and therefore has less rows to be knit. In total the pattern has 60+ (ca.) 17 rows = 77 rows. 77rows /6 days = 12,8 rows/day. I need to knit 13 rows each day to reach the goal of two weeks. Not that it’s too relevant right now, but I thought I’d give you calculations I did to begin with.

As one of you suggested I’m doing one of the sheep black. I had to redo the chart to make sure it looked good as it wasn’t just a matter of inverting the colors. The sheep has a black head but I used the white to outline the shape of the head. It does look a bit more like a ram with the white outline.

I wrote Elizabeth Wolden to hear if she would allow me to post my black sheep chart, but as I expected she said no. So you will have to go without it 😉

Meta Mitten: The black sheep.

Meta Mitten: The black sheep.

Notes and thoughts:

1. This is very very good beginners mitten for a first time color knitter! It is quick and easy and has some really nice details that makes the knit easier. It’s knit on bigger needles than most color work mittens and this makes it easier to overlook. Also she has written introduction to both color knit as well as reading a chart. The instructions are short and clear.

2. I have a problem with the pattern but it’s not the pattern in it self, it’s the layout of the pdf. It’s very heavy on the graphic side. Not that it’s a problem as such it’s just not to my liking. This is definitely a pattern that will gain from being printed out. I however always work with the pattern on my laptop and as the chart part of the pattern is tilted in landscape it can be pretty frustrating to read. I had to make the pages with chart into .jpeg and then tilt them to get a better read.

3. I must admit I was a bit puzzled to why Wolden decided to do the kind of decrease of the mitten she chose. She want to avoid getting a clear line of stitches along the ‘braid’ on the side of the mitten so it was a design choice and that I respect.

Materials: Granhøj Kamgarns Superwash

Materials: Granhøj Kamgarns Superwash

Elizabeth Woldens pattern contains an introduction to fair isle knitting or stranded knitting. It costs $ 5.00 USD. Wolden has also done a pattern for a matching hat which is adorable! You can find the pattern for the mitten here and the cap here on Ravelry (they can be purchased together as well here). She has also written about her design process on her blog.